Shelfari Shelf

Monday, August 24, 2015

Execution Force Assassins


 I was able to get the assassins from Execution Force from a friend who didn't need them.  They are all pretty cool, and I found them fairly easy to assemble.  The sprue configuration definitely lends credence to the rumor they will be released later on as single packs.


 They were all kept to the same pallet of GW paints, with Abaddon Black as the predominant color.  I have yet to play with them, but the Eversor is my favorite of them - aesthetically.  Rules-wise, I have always been a sucker for the Callidus.


 Having the White Dwarf with all of the rules is also a great money saver, as I had no intention of purchasing the e-book edition of their codex.  It will be interesting to see if the Assassins get incorporated into a larger codex in print, like one with Inquisition.


Monday, August 17, 2015

House Terryn Knights


 I chose to build my Knight Titans in House Terryn colors for their connection to the Ultramarines.  Also, their proximity to Ultramar - as noted in the Imperial Knights codex - helps as well.  Initially I built only the one knight with the rapid fire battle cannon and reaper chainsword.  This model does have some painting differences, mainly how I missed the red back halves of the shoulder pads.  Also, the differences in how I painted their bases too.


 The second Knight I built was the Knight Crusader, mainly because at heart, I am a player who would rather shoot or form a gun line, than charge.  Each of the Knights was given heraldry that somewhat mimics what is depicted in the codex, though there are weapon variations.  For instance, the missile pod seems much more worthwhile than the anti-aircraft weapon.


 The last Knight I built was the Knight Warden.  This Knight is the Baron of my formation, which is one of the reasons why I differentiated it slightly, but giving it gold smoke stacks instead of silver.


Monday, August 10, 2015

Ultramarines Spartan


The biggest difficulty I had with this model was one of the energy cables disappearing on me while building it.  Otherwise it is basically just a bigger Land Raider.  Not wanting to have to bother with water slide transfers, I opted to raid my dwindling supply of brass etched.


 Knowing the scare effect Land Raiders have upon players, I am sure the Spartan would have a similar "kill it fast" effect.  That kind of psychological effect can be interesting to observe, especially when playing in tournaments that allow Forge World.  Though this purchase was mainly a way to round out my Ultramarines Chapter, it also helps beef up my Pre-Heresy force, which does include a 20 Marine Tactical squad.


While working on this model, I found another on Ebay, so expect to see Spartan 2 as a post some time in the future.


Monday, August 3, 2015

Ultramarines Deredeo


When I first saw the Deredeo, I knew it was a model I would want to add to my collection immediately.  I think this kind of impulse buying is one of the things Forge World relies on, because if I had waited, I most likely would have picked up the plasma carronade variant instead.


However, now I am not sure if I will just add another Deredeo, and if I do, then it probably would be a benefit to add a third, since most vehicles now come in squadrons of three.

 However, this model fulfills the desire I had to build a Contemptor with twin assault cannons and missile launcher, so I feel I can wait to add my third Contemptor when the Ultramarine variant is released.

Monday, July 27, 2015

Objective Markers

When the wounded Space Marine figures came out a couple years ago, I promptly order two packs.  An error in the packaging gave me a total of five wounded marines.  I painted them up like generic Ultramarines and then let them sit in my display case for a long time.  With the emphasis on objectives in 7th edition, I brought them out and retouched them.  I also was able to acquire the wounded terminator from one of the Tyranid kits, giving me sick dead or wounded marines. 


Touching up the already existing models, I made each one a different company, from two through six, and then added water slide transfers to emphasize that each company was also an objective number.  Especially since not every player may be as aware of Space Marine and Ultramarine details as myself.


Tuesday, July 21, 2015

Roboute Guilliman - Part 2


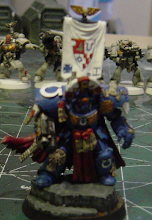
         As I continued to work on Guilliman, I worked to touch up different layers, as well as add each layer of color.  For these layers, I had to wait for the Argax Earthshade to dry.  First I added a layer of Kantor Blue.  A layer of Warpstone Glow was added to the green areas, Ceramtie white for the white, Gehenna's Gold for the gold areas and Ironbreaker for the silver.  Then I added a layer of P3 Midlund Flesh to the face.  The scenic base was given a coat of The Fang to begn attempting to layer in the marbling effect.


 The next group of layers were Russ Grey on the scenic base, Warboss Green on the laurels, a second coat of Ceramtie White to the white areas, including the cloak, and a wash of Reikland Flesh on the face.  His hair was also given a coat of Averlund Sunset.  The leather straps got a layer of Skrag Brown.


     Once the wash dried on the face, another coat of P3 Midlund Flesh was applied, tightening up the area around the eyes.  Then a .005 Micron Pen was used for the pupils.  The blue areas were given a coat of Macragge Blue as well.


 The white areas were then given two coast of White Scar, and final highlights were applies to the smaller details, gold got an edge highlight of the old GW Shining Gold, the laurels a highlight of Moot Green, brown an edge highlight of Balor Brown.


The scenic base got two coats of Ceramite White.


Finally, the base got two coats of White Scar, and then the edge of the actual base got a coat of Abaddon Black.


Guilliman's armour then got a layer of Altdorf Guard Blue, followed by edge highlights of Calgar Blue.  His hair also got a layer of Zamesi Dessert.


The last thing Guilliman gets is a coat of Abaddon Black on his scabbard.


Once the model was finished, I sprayed it with a coat of Testor's Dullcote.


Monday, July 13, 2015

Roboute Guilliman, Primarch of the Ultramarines - Part 1

 Changing careers and going back to school has left with me little free time this past year, and much of the time I had to work on projects was consumed by commission work.  I had been thinking about coming back to this blog for a while, but I wanted to do so with a project that I was truly enthusiastic about, and could bring a new look to the way I present my work.  I chose a model I would have waited an eternity for, Ultramarines Primarch Roboute Guilliman.  Having seen after market versions of Guilliman, and the Horus Heresy novels presaging his release, there were images of Guilliman already out there.  I even managed to snag a copy of his Horus Heresy card game card.  I fell in love with this model when I first saw it, but also knew that the scenic base was something that needed to be detachable, as hauling around marble statuary.  Above is my initial look at the pieces of the kit.

 The scenic base goes together really easy, with only the iron halo type piece on one of the banners being something small and fidly to worry about.  Guilliman himself also goes together fairly easy, though I had to fudge where the pistol goes on his back.  The only pieces that cause any real difficulty are the Ultima (or Agemo if you prefer) symbols that attach to his leather waist straps.
 
Guilliman has a pair of tabs on his feet that allow him to naturally seat on the display base, allowing him to be interchangeable without fancy magnets or pinning.

 I used the tabs on Guilliman's feet to carve out the spaces for him to sit on the base to be used in game.
 The base then just got a coat of Stirland Mud for texture, and Abaddon Black around the rim.
 When I begin painting a model, I prime black, and then base coat the areas I plan to wash.  These areas received base coats of Warplock Bronze for the gold areas, Leadbelcher for the silver areas and Zandri Dust for the tan areas.  Then a wash of Argax Earthshade was brushed over those areas and left to dry.  Next time, I will work through the layers I use to finish the model.